Breve descrição
The students build and use an old navigational tool from the Arab world of the 9th century, the kamal. After an introduction to historic seafaring and navigation, they build this simple tool and understand how it can be used to measure angles. After learning that the elevation of Polaris is (almost) identical to the latitude of the observer, they apply this knowledge while using the kamal. During a field trip, they actually measure the elevation of Polaris. The result is compared with modern methods.
This resource is part of the educational kit "Navigation Through the Ages". You can read more about the kit in the presentation attached. Find all related resources selecting the category "Navigation Through the Ages" and "secondary level".
Objetivos
With this activity, the students will learn that
- celestial navigation and corresponding tools have been developed already many centuries ago.
- the kamal is a simple tool to measure the elevations of stars.
- with the kamal we can nowadays easily determine our latitude on Earth.
Objetivos de aprendizagem
At age 14, students should already understand the concepts of simple trigonometry as well as latitude and longitude for defining a position on Earth. This knowledge is combined with basic astronomy. The students learn that the North Star, Polaris, can be used to determine the latitude. The elevation of the celestial pole is identical to the angle of the latitude. By coincidence, Polaris is close to the northern pole. Therefore, we can use its elevation as a proxy.
In addition, students apply the simple geometry of right-angled triangles to understand how the kamal works. It subtends an angle that depends on its height and distance from the observer. Altogether, they learn, how ancient navigators were able to find their course across the open sea. They build their own kamal and apply it to measure the elevation of Polaris and compare it to the latitude of their location on Earth using maps or online map services.
Avaliação
The evaluation is done twofold: by checking the results of the activities and from the answers of the students and their discussions. The activity section is flanked by questions that are answered in order of their appearance as follows:
Introduction
Ask the students, if they had an idea for how long mankind already uses ships to cross oceans.
It is believed that ships have been used to cross large distances already 3000 BCE or earlier.
Ask them, what could have been the benefit to try to explore the seas.
Finding new resources and food, trade, spirit of exploration, curiosity.
Ask the students, how they find the way to school every day. What supports their orientation to not get lost?
Known landmarks like roads, prominent buildings, traffic lights, bus stops, i.e. reference points.
Ask the students, how navigators were able to find their way on the seas.
Compass (rather late invention), sailing along the coastline and lighthouses (landmarks), celestial objects (Sun, Moon, stars)
Activity: Building the kamal
The students should follow the instructions. The teacher can help when needed. The final result can be checked.
Activity: Angles in the sky
Show the students the picture in Figure 13 (the star trails). Ask them what this picture shows, in particular, where the bright curved lines come from.
As the Earth rotates, the stars seem to revolve around a common point. This is the celestial pole. Long exposures visualise the path of the stars as trails.
Ask the students, how this picture tells us, that some stars do not set or rise during a full day.
Many trails can be followed to form a full circle. One rotation is 24 hours.
Ask them, if they knew a star that is close to the celestial North Pole and if they can find it on the picture.
This is Polaris or the North Star. It is the star that produces the smallest trail close to the centre of the trails.
Ask the students, where this star or the pole would be in the sky, when they stood exactly on the North Pole of the Earth or on the Equator.
North Pole: Zenith, i.e. directly above
Equator: at the northern horizon
Finding Polaris
Explain and exercise the procedure until the students can explain it to their peers. The correct finding can be checked with laser pointers (only to be operated by teachers).
Measuring the elevation of Polaris
The values of the various individuals and groups may differ. Ask them, why they think, the results are not always identical.
Manufacturing not perfect (esp. knot positions), different sizes change perspective a bit, kamal was not always held correctly
Ask them, how this would affect real navigation on open seas.
Small errors of a few degrees can lead to course deviations. One degree in latitude corresponds to 60 nautical miles. Repeated measurements and additional information can mitigate this effect.
Analysis
Let the students check their result with a local map that provide coordinates or online services like Google Maps or Google Earth. The students may realise that the result differs from their own measurement. Let them write down reasons, why that is the case.
Same as above.
During the next lesson, let them discuss their results.
This helps repeating and reinforcing their experiences and fresh knowledge.
Material
The list contains items needed by one student. Some of them can be shared by two to four individuals.
- Worksheets (star trails picture, map to find Polaris, observing sheet)
- Kamal or materials and instructions to build one
- Pencil
- Torch (for outside activity)
Constructing the kamal:
- one piece of ply wood (preferred) or very stiff card board (21 cm x 12 cm x 4 mm)
- 50 cm of cord
- Pencil
- Ruler
- Saw (for the wood) or scissors (for the cardboard), if the board has to be cut to fit the size needed
- Drill (for the wood) or thick needle (for the cardboard)
Informações de referência
Latitude and longitude

Figure 1: Illustration of how the latitudes and longitudes of the Earth are defined (Credits: Peter Mercator, djexplo, CC0).
Any location on an area is defined by two coordinates. The surface of a sphere is a curved area, but using coordinates like up and down does not make much sense, because the surface of a sphere has neither a beginning nor an ending. Instead, we can use spherical polar coordinates originating from the centre of the sphere, where the radius is fixed by its size (Figure 1). Two angular coordinates remain which for the Earth are called the latitude and the longitude with the rotation providing the symmetry axis. The North Pole is defined as the point, where the theoretical axis of rotation coincides with the surface of the sphere and the rotation is counter-clockwise when looking at the pole from above. The opposite point is the South Pole. The equator is defined as the great circle half way between the two poles.
The latitudes are circles parallel to the equator. They are counted from 0° at the equator to ±90° at the poles. The longitudes are great circles connecting the two poles of the Earth. For a given position on Earth, the longitude going through the zenith, the point directly above, is called the meridian. This is the line the Sun apparently crosses at local noon. The origin of this coordinate is defined as the meridian of Greenwich, where the Royal Observatory of England is located. From there, longitudes are counted from 0° to ±180°.
Example: Heidelberg in Germany is located at 49.4° North and 8.7° East.
Elevation of the pole (pole height)
If we project the terrestrial coordinate system of latitudes and longitudes at the sky, we get the celestial equatorial coordinate system. The earth equator becomes the celestial equator and the geographical poles are extrapolated to build the celestial poles. If we were to make a photograph with a long exposure of the northern sky, we would see from the trails of the stars that they all revolve about a common point, the northern celestial pole (Figure 2).

Figure 2: Trails of stars at the sky after an exposure time of approximately 2 hours (Credit: Ralph Arvesen, Live Oak star trails, https://www.flickr.com/photos/rarvesen/9494908143, https://creativecommons.org/licenses/by/2.0/legalcode)
In the northern hemisphere, there is a moderately bright star near the celestial pole, the North Star or Polaris. It is the brightest star in the constellation the Little Bear, Ursa Minor (Figure 3). In our era, Polaris is less than a degree off. However, 1000 years ago, it was 8° away from the pole. Therefore, today we can use it as a proxy for the position of the celestial north pole. At the southern celestial pole, there is no such star that can be observed with the naked eye. Other procedures have to be applied to find it.
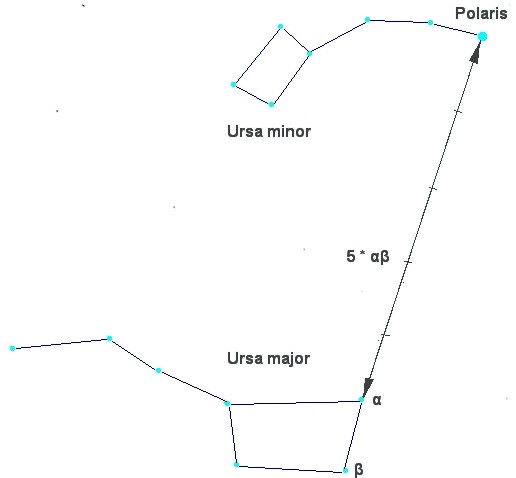
Figure 3: Configuration of the two constellations Ursa Major (Great Bear) and Ursa Minor (Little Bear) at the northern sky. Polaris, the North Star, which is close to the true celestial north pole, is the brightest star in Ursa Minor (Credit: Bonč, https://commons.wikimedia.org/wiki/File:Ursa_Major_-_Ursa_Minor_-_Polaris.jpg, “Ursa Major – Ursa Minor – Polaris”, based on https://commons.wikimedia.org/wiki/File:Ursa_Major_and_Ursa_Minor_Constellations.jpg, colours inverted by Markus Nielbock, https://creativecommons.org/licenses/by-sa/3.0/legalcode).
If we stood exactly at the geographical North Pole, Polaris would always be directly overhead. We can say that its elevation would be (almost) 90°. This information already introduces the horizontal coordinate system (Figure 4). It is the natural reference we use every day. We, the observers, are the origin of that coordinate system located on a flat plane, whose edge is the horizon. The sky is imagined as a hemisphere above. The angle between an object in the sky and the horizon is the altitude or elevation. The direction within the plane is given as an angle between 0° and 360°, the azimuth, which is usually measured clockwise from North. In navigation, this is also called the bearing. The meridian is the line that connects North and South at the horizon and passes the zenith.

Figure 4: Illustration of the horizontal coordinate system. The observer is the origin of the coordinates assigned as azimuth and altitude or elevation (Credit: TWCarlson, https://commons.wikimedia.org/wiki/File:Azimuth-Altitude_schematic.svg, „Azimuth-Altitude schematic“, https://creativecommons.org/licenses/by-sa/3.0/legalcode).
For any other position on Earth, the celestial pole or Polaris would appear at an elevation smaller than 90°. At the equator, it would just appear at the horizon, i.e. at an elevation of 0°. The correlation between the latitude (North Pole = 90°, Equator = 0°) and the elevation of Polaris is no coincidence. Figure 5 combines all three mentioned coordinate systems. For a given observer at any latitude on Earth, the local horizontal coordinate system touches the terrestrial spherical polar coordinate system at a single tangent point. The sketch demonstrates that the elevation of the celestial north pole, also called the pole height, is exactly the northern latitude of the observer on Earth.

Figure 5: When combining the three coordinate systems (terrestrial spherical, celestial equatorial, local horizontal), it becomes clear that the latitude of the observer is exactly the elevation of the celestial pole, also known as the pole height (Credit: M. Nielbock, own work).
From this we can conclude that if we measure the elevation of Polaris, we can determine our latitude on Earth with reasonable precision.
Triangles and trigonometry
The concept of the kamal relies on the relations within triangles. Those are very simple geometric constructs that already the ancient Greeks have been working with. One basic rule is that the sum of all angles inside a triangle is 180° or π. This depends on whether the angles are measured in degrees or radians. One radian is defined as the angle that is subtended by an arc whose length is the same as the radius of the underlying circle. A full circle measures 360° or 2π.
The sides of a triangle and its angles are connected via trigonometric functions, e.g. sine, cosine and tangent. The easiest relations can be seen in right-angular triangles, where one of the angles is 90° or π/2.

Figure 6: A right-angled triangle with γ being the right angle (Credit: Dmitry Fomin, CC0).
The hypotenuse is the side of a triangle opposite of the right angle. In Figure 6, it is c. The other sides are called legs or catheti. The leg opposite to a given angle is called the adjacent leg, while the other is the opposed leg. In a right-angled triangle, the relations between the legs and the hypotenuse are expressed as trigonometric functions of the angles.
The Pythagorean Theorem tells us something about the relations between the three legs of a right-angled triangle. It is named after the ancient Greek mathematician Pythagoras and says that the sum of the squares of the catheti is equal to the square of the hypotenuse.

For general triangles, this expands to the law of cosines.

For γ=90° it reduces to the Pythagorean Theorem.
Early navigational skills
Early seafaring peoples often navigated along coastlines before sophisticated navigational skills were developed and tools were invented. Sailing directions helped to identify coastal landmarks (Hertel, 1990). To some extent, their knowledge about winds and currents helped them to cross short distances, like e.g. in the Mediterranean.
Soon, the navigators realised that celestial objects, especially stars, can be used to keep the course of a ship. Such skills have been mentioned in early literature like Homer’s Odyssey which is believed to date back to the 8th century BC. There are accounts of the ancient people of the Phoenicians who were able to even leave the Mediterranean and ventured on voyages to the British coast and even several hundred miles south along the African coast (Johnson & Nurminen, 2009). A very notable and well documented long distance voyage has been passed on by ancient authors and scholars like Strabo, Pliny and Diodorus of Sicily. It is the voyage of Pytheas, a Greek astronomer, geographer and explorer from Marseille who around 300 BC apparently left the Mediterranean by passing Gibraltar and made it up north until the British Isles and beyond the Arctic Circle, where he possibly reached Iceland or the Faroe Islands that he called Thule (Baker & Baker, 1997). Pytheas already used a gnomon or a sundial, which allowed him to determine his latitude and measure the time during his voyage (Nansen, 1911).
Sailing along a latitude
At these times, the technique of sailing along a parallel (of the equator) or latitude was used by observing circumpolar stars. The concept of latitudes in the sense of angular distances from the equator was probably not known. However, it was soon realised that when looking at the night sky, some stars within a certain radius around the celestial poles never set; they are circumpolar. When sailing north or south, sailors observe that the celestial pole changes, too, and with it the circumpolar radius. Therefore, whenever navigators see the same star culminating – transiting the meridian – at the same elevation, they stay on the “latitude”. For them, it was sufficient to realise the connection between the elevation of stars and their course. Navigators had navigational documents that listed seaports together with the elevation of known stars. On order to reach the port, they simply sailed north or south until they reached the corresponding latitude and then continued west or east.
Nowadays, the easiest way to determine one’s own latitude on Earth is to measure the elevation of the North Star, Polaris, as a proxy for the true celestial North Pole. In our era, Polaris is less than a degree off. However, 1000 years ago, it was 8° away from the pole.
The Kamal
The kamal is a navigational tool invented by Arabian sailors in the 9th century AD (McGrail, 2001). Its purpose is to measure stellar elevations without the notion of angles. If you stretch out your arm, one finger subtends an angle. This method appears to have been the earliest technique to determine the elevation of stars. In the Arabian world, this “height” is called isba (إصبع) which simply means finger. The corresponding angle is 1°36‘ (Malhão Pereira, 2003).
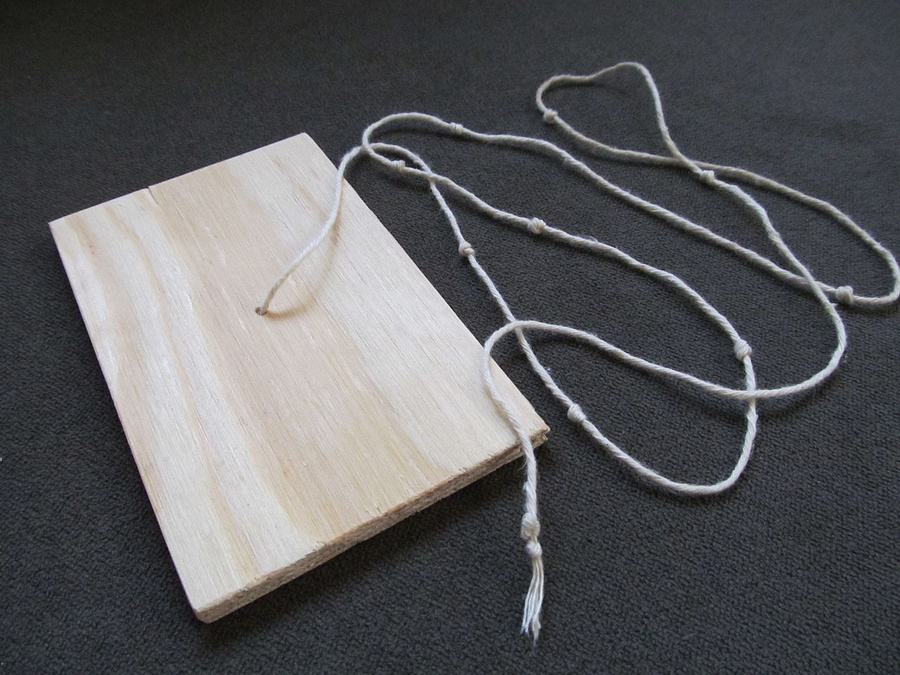
Figure 7: A simple wooden kamal. It consists of a surveying board and a cord with a line of knots (Credit: Bordwall https://commons.wikimedia.org/wiki/File:Simple_Wooden_Kamal_(Navigation).jpg, „Simple Wooden Kamal (Navigation)“, https://creativecommons.org/licenses/by-sa/3.0/legalcode).
This method was standardised by using a wooden plate, originally sized roughly 5 cm x 2.5 cm, with a cord attached to its centre. When held at various distances, the kamal subtends different angles between the horizon and the stars (Figure 8). Knots located at different positions along the cord denote the elevations of stars and, consequently, the latitude of various ports.
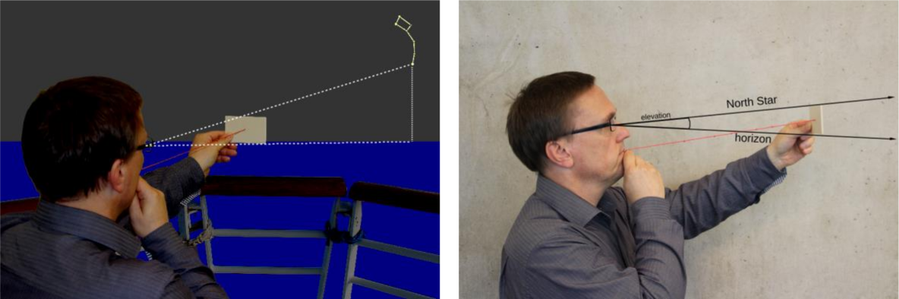
Figure 8: Illustration of how the kamal was used to measure the elevation of a star, in this case Polaris. The lower edge was aligned with the horizon. Then, the distance between the eyes and the kamal was modified until the upper edge touched the star. The distance was set by knots tied into the cord that was held between the mouth and the kamal. The knots indicated elevations of stars (Credit: M. Nielbock, https://commons.wikimedia.org/wiki/File:Kamal_Polaris.png, https://commons.wikimedia.org/wiki/File:Kamal_Polaris_Side.png, https://creativecommons.org/licenses/by/4.0/legalcode).
When Vasco da Gama set out to find the sea passage from Europe to India in 1497, he stopped at the Eastern African port of Melinde (now: Malindi), where the local Muslim Sheikh provided him with a skilled navigator of the Indian Ocean to guide him to the shores of India. This navigator used a kamal for finding the sailing directions (Launer, 2009).
Since the latitudes the Arabian sailors crossed during their passages through the Arabian and Indian Seas are rather small, the mentioned size of the kamal is sufficient. For higher latitudes, the board must be bigger to avoid very small lengths of the cord to realise such angles.
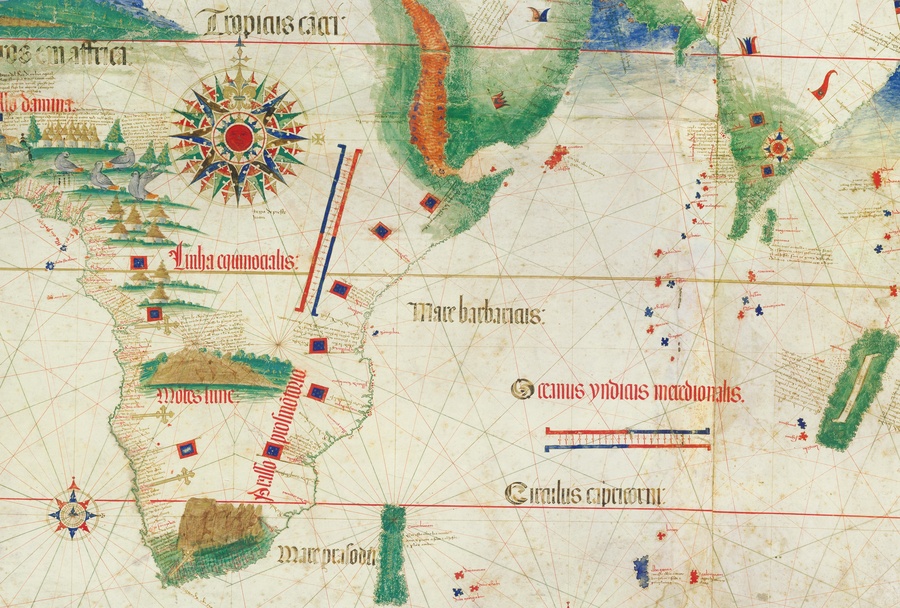
Figure 9: Excerpt of a world map from 1502 showing the Indian Ocean. All sea routes from the Arabian Peninsula and India lie between the Tropic of Cancer and the Equator. The port of Melinde is indicated at the third flag from the top at the eastern African coast (Credit: Cantino Planisphere, 1502, Biblioteca Estense Universitaria, Modena, Italy, https://commons.wikimedia.org/wiki/File:Cantino_planisphere_(1502).jpg, public domain).
The geometry of the kamal
To measure an angle φ with a kamal of height h, the distance between the eyes and the board held perpendicularly to the line of sight needed is l. This is realised by a knot in the cord on the side opposite to the kamal board. In this simple configuration we get:

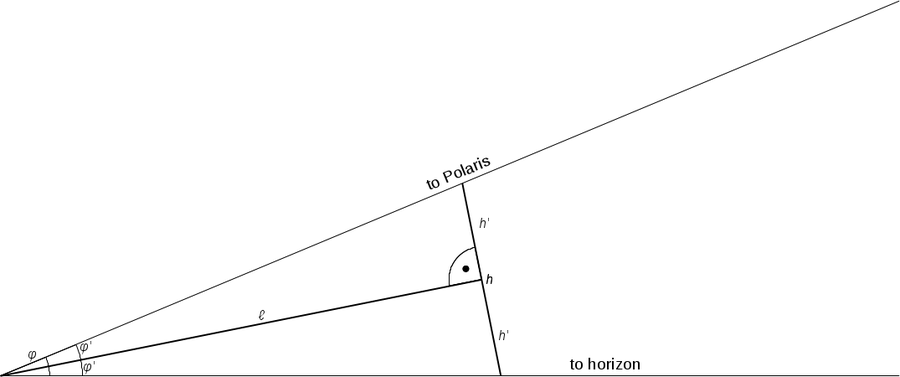
Figure 10: Simplified geometry of the kamal which subtends an angle φ between the horizon and Polaris. The kamal has a height labelled h. The length of the cord between the eyes and the kamal is labelled l (Credit: M. Nielbock, own work).
However, the measurement is done with the cord between the teeth or just in front of the lips. Eyes and mouth are separated by the length d (Figure 11). The true length of the cord is then l, while l' is the distance between the eyes and the kamal board that defines the angle φ. This more realistic approach leads to:

We see that for d = 0 we again get the simplified version above. The difference between l and l' can be a few centimetres. A realistic value for d is 7 cm.
This geometry is accurate enough for uncertainties inherent to the measuring method. Note that it is always assumed that the kamal board is held in an angle perpendicular to the line of sight, not the cord. In addition, the horizon is assumed to be the mathematical one (Figure 5). This means that the dip of the visible horizon is neglected.
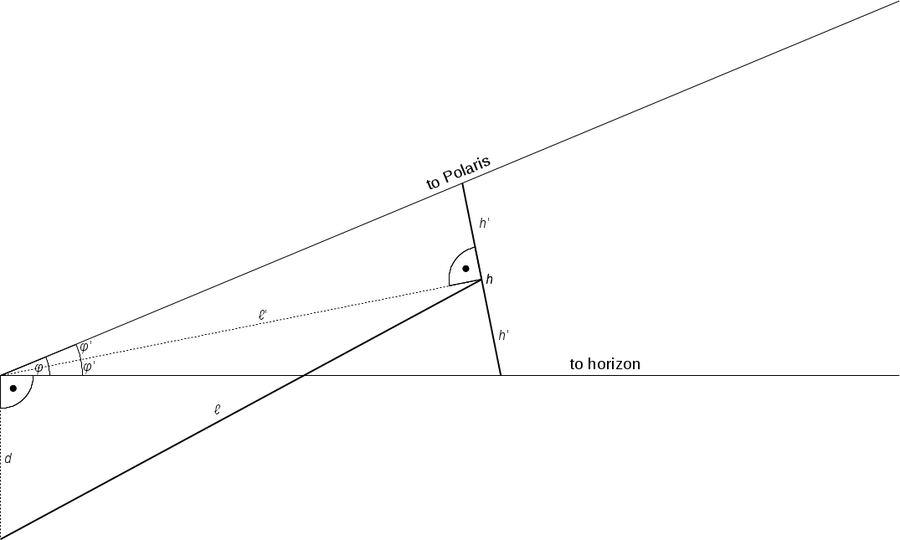
Figure 11: More realistic geometry of the kamal considering the difference in distance between the kamal on one side and the mouth and the eyes on the other. The distance between the mouth and the eyes is labelled d (Credit: M. Nielbock, own work).
Descrição da atividade completa
Introduction
It would be beneficial, if the activity be included into a larger context of seafaring, e.g. in geography, history, literature, etc.
Tip: This activity could be combined with other forms of acquiring knowledge like giving oral presentations in history, literature or geography highlighting navigation. This would prepare the field in a much more interactive way than what a teacher can achieve by summarising the facts.
Tip: There are certainly good documentaries available on sea exploration that could be shown as an introduction.
Tip: There are certainly good documentaries available on sea exploration that could be shown as an introduction.
English example:
https://www.youtube.com/watch?v=ie--mK3P_Wo
German example:
https://www.youtube.com/watch?v=MOUWFTWdBvE
Ask the students, if they had an idea for how long mankind already uses ships to cross oceans. One may point out the spread of the Homo sapiens to islands and isolated continents like Australia. Ask them, what could have been the benefit to try to explore the seas. Perhaps, someone knows historic cultures or peoples that were famous sailors. The teacher can support this with a few examples of ancient seafaring peoples, e.g. from the Mediterranean and the art of navigation.
Ask the students, how they find the way to school every day. What supports their orientation to not get lost? As soon as reference points (buildings, traffic lights, bus stops, etc.) have been mentioned ask the students, how navigators were able to find their way on the seas. In early times, they used sailing directions in connection to landmarks that can be recognised. But for this, the ships would have to stay close to the coast. Lighthouses improved the situation. But what could be used as reference points at open sea? Probably the students will soon mention celestial objects like the Sun, the Moon and stars.
Tell the story of the kamal and Vasco da Gama, the discoverer of the direct passage from Europe to India.
Activity: Building the kamal
This can be done by the teacher prior to the activities or introduced as an additional exercise for the students. An instruction manual is available separately.
Material needed:
- one piece of ply wood (preferred) or very stiff card board (21 cm x 12 cm x 4 mm)
- 50 cm of cord
- Pencil
- Ruler
- Saw (for the wood) or scissors (for the cardboard), if the board has to be cut to fit the size needed
- Drill (for the wood) or thick needle (for the cardboard)
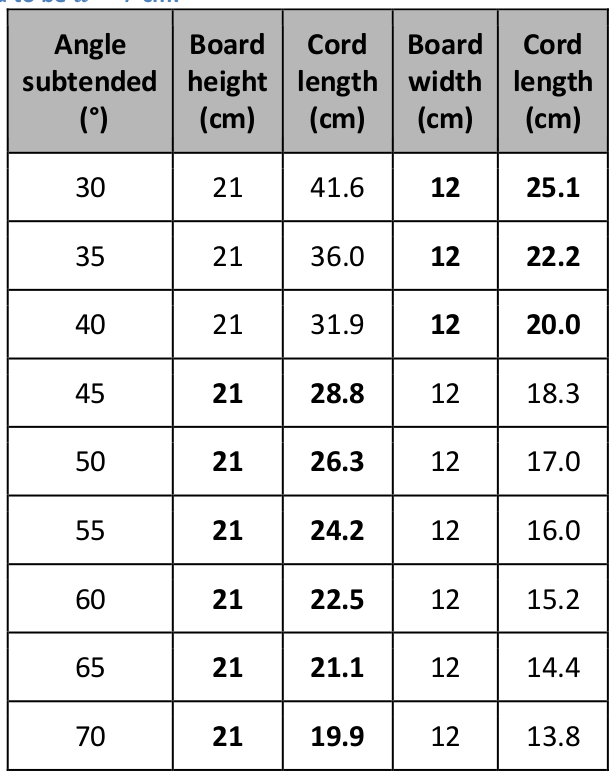
The kamal was originally conceived as a navigational tool for low latitudes. Therefore, its size was relatively small, i.e. a few centimetres. This was enough to measure angles of 10° to 20° degrees above the horizon. For example, for a kamal of 5 cm in height, a cord length of 20 cm yields an elevation measure of 15°. However, this relation is not linear. Therefore, for higher latitudes a larger kamal board is needed. A good compromise is a height of 21 cm, while the width can be 12 cm. With these dimensions, the following relations hold. For very low latitudes, the kamal can be rotated by 90° and the smaller width permits smaller cord lengths to reach the same angles.
Table 1: Dimensions and relations between angles and lengths of a kamal according to Eq. (7). The distance between the eyes and the mouth is assumed to be d = 7 cm.
For each kamal, prepare a thin piece of ply wood (approx. 4 mm) with 21 cm x 12 cm in size. If that is not available, a piece of very stiff cardboard of equal size is also possible. Determine the centre of the board by drawing or scratching two diagonal lines that connect opposite corners. Drill a hole through the centre that is big enough to permit the cord to fit through. It must also be small enough to not let it slide out again after tying a knot.

Figure 12: The kamal after running the cord in the central hole (Credit: M. Nielbock, own work).
Tie a knot at one end of the cord and run it in the central hole of the board. The knot should block the cord from sliding through the hole.
Now add knots at distances from the board as indicated in Table 1. Be careful to keep the cord straightened. You can restrict the number of knots according to the angular range needed for the activities. Remember that the elevation of Polaris corresponds to the latitude.
Fill out the table on the worksheet that lists the number of knots and the corresponding angles.
Activity: Angles in the sky
Preparations
Find a spot outside with a good view to the northern sky and the horizon. This activity can be done as soon as the North Star is visible. Therefore, the summer time may not the best season to carry out this activity.
Figure 13: Trails of stars at the sky after an exposure time of approximately 2 hours (Credit: Ralph Arvesen, Live Oak star trails, https://www.flickr.com/photos/rarvesen/9494908143, https://creativecommons.org/licenses/by/2.0/legalcode).
Show the students the picture in Figure 13 (available as separate file). Ask them what this picture shows, in particular, where the bright curved lines come from.
As the Earth rotates, the stars seem to revolve around a common point. This is the celestial pole. Ask the students, how this picture tells us, that some stars do not set or rise during a full day. These stars are called circumpolar.
Ask them, if they knew a star that is close to the celestial North Pole and if they can find it on the picture.
Ask the students, where this star or the pole would be in the sky, when they stood exactly on the North Pole of the Earth or on the equator.
This demonstrates that when the elevation of the North Star, Polaris, is known, we can determine, how far north we are on the Earth, i.e. the latitude. This is demonstrated by Figure 14.
Figure 14: Illustration that shows that the pole height, i.e. the elevation of the celestial pole above the horizon (blue), depends on the latitude (Credit: M. Nielbock, own work).
Finding Polaris
Finding Polaris in the sky is rather simple. As soon as the stars are visible, let the students look at them for a while and ask them, if they knew the group of stars that is often called the Big Dipper. Its name is different in different cultures (Ladle, Great Chariot, Plough, Drinking Gourd). It is easy to find in the northern hemisphere as it is always above the horizon.
Figure 15: Configuration of the two constellations Ursa Major (Great Bear) and Ursa Minor (Little Bear) at the northern sky. Polaris, the North Star, which is close to the true celestial north pole, is the brightest star in Ursa Minor (Credit: Bonč, https://commons.wikimedia.org/wiki/File:Ursa_Major_-_Ursa_Minor_-_Polaris.jpg, “Ursa Major – Ursa Minor – Polaris”, based on https://commons.wikimedia.org/wiki/File:Ursa_Major_and_Ursa_Minor_Constellations.jpg, colours inverted by Markus Nielbock, https://creativecommons.org/licenses/by-sa/3.0/legalcode).
Figure 15 explains how Polaris can be found using the Big Dipper (also available as individual image). Find the box of the stellar group and the two stars to the front (α,β in Figure 15). Extend the line between them five times and find a moderately bright star. This is Polaris, the North Star.
Measuring the elevation of Polaris
Now the students use the kamal. The cord must be kept straightened during measurements. The board must be held with the smaller edges up and down and perpendicular to the line of sight. Any tilt would compromise the measurement.
Similar as shown in Figure 16, the lower edge of the kamal must be aligned with the horizon. Then, the length of the cord is modified until the upper edge touches the star. The alignment with the horizon and the star should be checked again.
Figure 16: Illustration of how the kamal was used to measure the elevation of a star, in this case Polaris. The lower edge was aligned with the horizon. Then, the distance between the eyes and the kamal was modified until the upper edge touched the star. The distance was set by knots tied into the cord that was held between the mouth and the kamal. The knots indicated elevations of stars (Credit: M. Nielbock, https://commons.wikimedia.org/wiki/File:Kamal_Polaris.png, https://commons.wikimedia.org/wiki/File:Kamal_Polaris_Side.png, https://creativecommons.org/licenses/by/4.0/legalcode).
The students count the number of knots needed to keep the kamal aligned. Counting starts with the knot closest to the board. Perhaps, they will have to interpolate the position between two knots. They write down the number and read off the corresponding angle from the list in their worksheet. This is the latitude they will have determined.
The values of the various individuals and groups may differ. Ask them, why they think, the results are not always identical.
Ask them, how this would affect real navigation on open seas.
Analysis
This can be done as homework and compared during the next lesson in school. Let the students check their result with a local map that provides coordinates or online services like Google Maps or Google Earth.
In Google Earth, you can right-click on your location and then click on “What’s here?”. A small window appears at the bottom of the screen that lists two numbers. The first is the latitude in degrees with decimals. This number is added to the worksheet.
The students may realise that the result differs from their own measurement. Let them write down reasons, why that is the case.
During the next lesson, let them discuss their results.
Currículo
Space Awareness curricula topics (EU and South Africa)
Navigation through the ages, coordinate systems, latitude, longitude
Conclusão
The kamal is a navigational tool that was invented by Arab navigators and has been used for many centuries since. This activity uses the example of the kamal to demonstrate how navigation at sea can be successful with some knowledge about astronomy and the stars combined with simple tools. The students learn some major aspects of the history of navigation by applying basics of math and astronomy. They build their own kamal and learn how to use it to determine their latitude on Earth by using Polaris as the resting reference point in the sky. With his activity, they get a feeling for what it took to find one’s way on the oceans.
This resource was developed by Markus Nielbock, Haus der Astronomie, Heidelberg, Germany. This resource is under peer-review, proof reading, and will be updated and improved in the coming year.

